Token locking is one of the most powerful things a project can do to build trust with its community. When you lock tokens, you are making a public, on-chain commitment that a certain number of tokens cannot be moved or sold until a future date. Investors, traders, and community members can verify this lock at any time, which shows them that the team is serious about the long term success of the project.
Solauncher makes it easy to lock both regular SPL tokens and LP tokens from pools like Raydium, PumpSwap, and Meteora. The entire process takes just a few minutes and requires no coding experience whatsoever.
What Is Token Locking?
When you lock tokens, you send them into a smart contract that holds them securely until a date you choose in advance. Nobody can touch those tokens before that date, not even you. Once the unlock date arrives, the tokens are released and sent back to the address you specified when you created the lock.
This process is powered by the Bonfida Token Vesting program, which has been professionally audited by Kudelski Security. That means the underlying smart contract has been reviewed by security experts and confirmed to be safe for locking real assets.
Why Lock Your Tokens?
Build trust with investors
When buyers can see that team tokens or liquidity tokens are locked on chain, they know the team cannot rug pull or dump tokens during the lock period. This is one of the first things serious investors look for before putting money into a project.
Lock liquidity pool tokens
Locking LP tokens proves that the liquidity in a trading pool cannot be removed until the lock expires. This protects traders from a common type of scam where a creator adds liquidity, pumps the price, and then pulls all the liquidity out immediately.
Vesting for team allocations
If you are distributing tokens to team members or early contributors, locking their tokens means they have to wait for the lock to expire before they can sell. This aligns everyone on building long term value instead of selling at the first opportunity.
Public verification
Every lock created on Solauncher is fully visible on the blockchain. Anyone can look up your lock and see exactly how many tokens are locked, when they unlock, and where they will be sent once the lock expires.
What You Need Before Starting
Before you begin, make sure you have the following ready.
- A connected Solana wallet. Phantom, Solflare, and Backpack all work with Solauncher. Your wallet needs to be connected before you can create a lock.
- Enough SOL to cover the service fee. Locking a regular SPL token costs 0.1 SOL. Locking an LP token costs 0.4 SOL. Make sure your wallet has enough SOL to cover this fee plus a small amount for the transaction itself.
- The token mint address. This is the unique address that identifies the token you want to lock. You can find it on any Solana explorer by searching for your token name, or copy it directly from your wallet.
- The amount of tokens you want to lock. Decide in advance how many tokens you are locking. You can lock a portion of your total supply or the full amount.
- The unlock date and time. Choose the future date when the tokens will be released. This must be a date in the future. Once you submit the lock, this date cannot be changed.
Step by Step: How to Lock Tokens
Connect Your Wallet
Open the Token Locker
Choose the Token Type
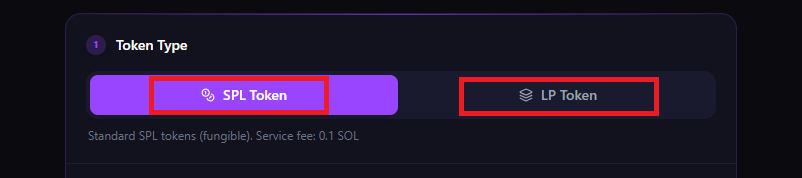
The first section asks you to choose between two types of tokens.
SPL Token
Choose this if you are locking a standard fungible token. This is the most common type and covers most regular project tokens and meme coins. The service fee for this option is 0.1 SOL.
LP Token
Choose this if you are locking liquidity pool tokens from a DEX like Raydium, PumpSwap, or Meteora. LP tokens represent your share of a liquidity pool. The service fee for this option is 0.4 SOL.
If you are not sure which type your token is, look at where it came from. If you received it by adding liquidity to a pool, it is an LP token. If it is a regular project token or meme coin, it is an SPL token.
Enter the Token Details
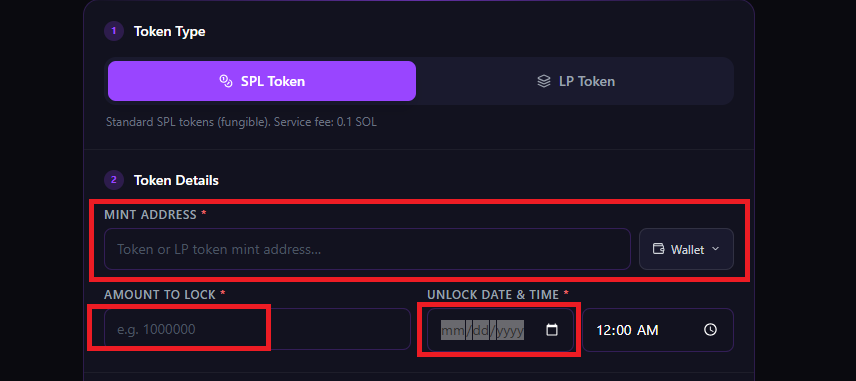
The second section has three fields to fill in.
Mint Address
Type or paste the mint address of the token you want to lock. As soon as you enter a valid address, Solauncher will automatically fetch the token information from the blockchain. You will see a small loading indicator while it does this. If the address is valid, the form will confirm the token details silently and allow you to continue.
Amount to Lock
Enter the number of tokens you want to lock. This is the raw token amount, not a dollar value. For example, if you want to lock one million tokens, type 1000000. The number you enter must not exceed the amount currently in your wallet.
Unlock Date and Time
Click the date field and choose the calendar date when the tokens should be released. Then set the time using the time field beside it. The date and time you choose must be in the future. If you try to set a date in the past, the form will not let you proceed.
Set the Recipient
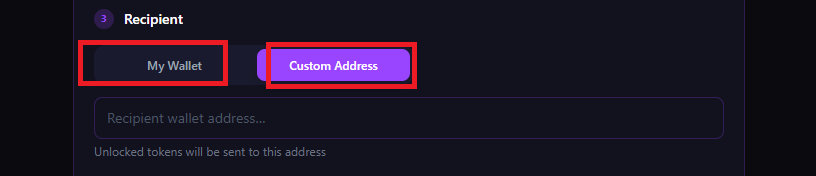
The third section lets you choose where the tokens go after the lock expires.
My Wallet
Select this option to have the tokens returned to your own wallet when the lock expires. This is the most common choice for project owners locking their own supply.
Custom Address
Select this option if you want the tokens to go to a different wallet after the lock expires. Type or paste the recipient wallet address into the field that appears. This is useful for vesting arrangements where tokens belong to someone else at unlock time.
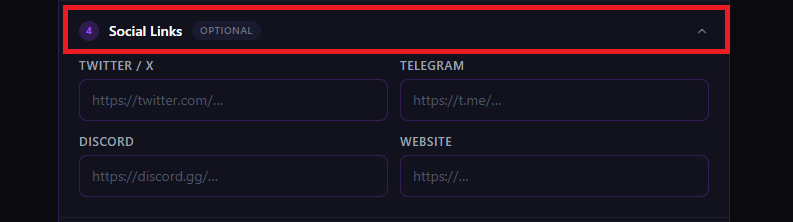
Add Social Links (Optional)
The fourth section is optional but recommended if you are locking tokens as a trust signal for your community. Click on the Social Links section to expand it.
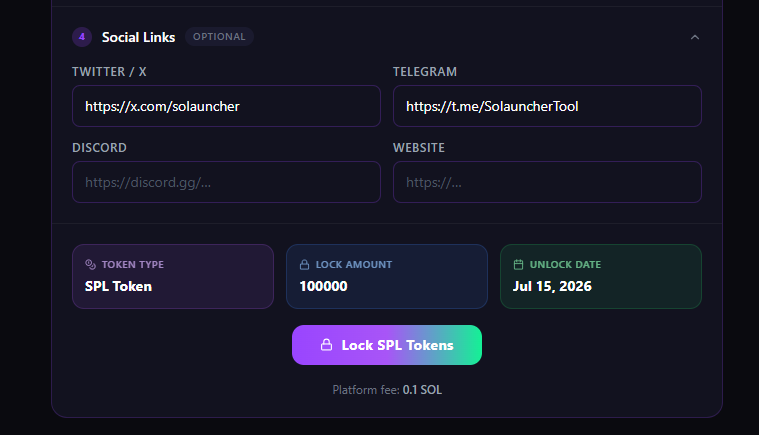
You can enter links to your project's Twitter or X profile, Telegram group, Discord server, and website. These links are saved alongside your lock record so that anyone exploring locks on the platform can find your project and verify who created the lock.
If you do not have any social links yet, you can skip this section entirely and proceed to the next step.
Review the Lock Summary
Click Lock Tokens and Sign
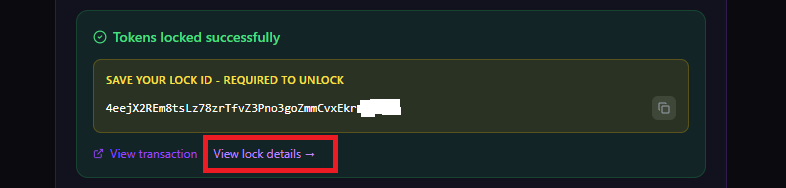
Save Your Lock ID
What Happens After the Lock Expires?
When the unlock date you set arrives, your tokens become available to claim. At that point you will need to return to the locker, find your lock using the Lock ID you saved, and submit an unlock transaction. The tokens will then be sent to the recipient address you specified when you created the lock.
The tokens do not release automatically on the unlock date. You need to come back and trigger the unlock yourself. The unlock date is simply the earliest moment the tokens can be released. They stay safely in the vesting contract until you claim them.
Things to Know Before You Lock
- Locks are permanent until the unlock date. Once you create a lock, nobody can cancel it or release the tokens early. Not you, not Solauncher, not anyone. This is by design and is what makes the lock credible to your community.
- Token-2022 tokens may not work correctly. The Bonfida vesting program was built for the original SPL Token standard. If you try to lock a Token-2022 token, the form will warn you and the transaction may fail. Stick to standard SPL tokens for reliable results.
- Test on devnet first. If you have never locked tokens before, switch the network selector at the top of the page to Devnet and run through the full process with a test token before locking real assets on mainnet.
- Keep your Lock ID safe. The Lock ID is your key to unlocking the tokens later. Write it down, save it in a notes app, or bookmark the lock details page. Do not rely on memory alone.
- Anyone can verify your lock. The lock is public on the blockchain. You can share the lock details page link with your community to show them proof that the tokens are locked and exactly when they will be released.
Frequently Asked Questions
Can I lock tokens more than once?
Yes. You can create as many separate locks as you want. Each lock has its own Lock ID, its own amount, and its own unlock date. For example, you might lock team tokens for one year and liquidity tokens for six months as two separate locks.
Can I change the unlock date after locking?
No. The unlock date is set permanently when you create the lock. This is intentional because the whole point of a lock is that it cannot be altered. If you need a different unlock date, you would have to create a new lock after the original one expires.
What happens if I lose my Lock ID?
Your lock still exists on the blockchain and your tokens are safe. You can find your lock by going to the Explore Locks page on Solauncher and searching by your wallet address or the token mint address. The Lock ID is visible on the lock details page once you find it.
Is this safe? Who controls the locked tokens?
The locked tokens are held by the Bonfida Token Vesting smart contract, which is open source and has been audited by Kudelski Security. Nobody, including Solauncher, can access the tokens while they are locked. Only the vesting contract controls them, and only it can release them to the recipient on or after the unlock date.
Can I lock LP tokens from any DEX?
Yes. Solauncher supports LP tokens from Raydium, PumpSwap, Meteora, and other Solana DEXes. Make sure to select LP Token in the token type section before entering your LP token mint address.
Conclusion
Locking tokens is one of the simplest and most effective ways to demonstrate commitment to your project. It takes only a few minutes on Solauncher and the result is a permanent, publicly verifiable proof that your tokens are secured until the date you chose.
Whether you are locking team allocations, investor tokens, or liquidity pool tokens, the process is the same. Connect your wallet, fill in the details, sign the transaction, and save your Lock ID. That is all it takes.
Ready to lock your tokens?
Build trust with your community by creating a verifiable token lock in minutes.
Lock Tokens NowRate this guide
4.8 / 5 · Vote count: 143